配置应用程序

使用Docker部署应用程序时,一般常用的配置方式有:
- 配置内嵌
- 启动传参配置
- 环境变量
经过前面容器持久化存储的介绍,我们很容易能想到是以挂载卷的形式,比如:
- gitRepo
- hostPath
- NFS
再结合边车模式来进行配置文件的管控是可行的,然而有一种更加简便的方法能将配置数据置于Kubernetes的顶级资源对象中,那就是ConfigMap。
传递命令行参数
在上一节容器持久化存储的emptyDir概念介绍部分,我们引入了一个fortune-pod的例子,再回顾一下之前的配置文件吧,如下:
apiVersion: v1
kind: Pod
metadata:
  name: fortune
spec:
  containers:
  - image: luksa/fortune
    name: html-generator
    volumeMounts:
    - name: html
      mountPath: /var/htdocs
  - image: nginx:alpine
    name: web-server
    volumeMounts:
    - name: html
      mountPath: /usr/share/nginx/html
      readOnly: true
    ports:
    - containerPort: 80
      protocol: TCP
  volumes:
  - name: html
emptyDir: {}此应用程序设定了每隔10s就会自动生成输出到html,现在我们要做的是通过命令行参数,自行设定隔多少秒自动生成内容。
创建文件fortune-pod-args.yaml,输入以下内容:
apiVersion: v1
kind: Pod
metadata:
  name: fortune2s
spec:
  containers:
  - image: luksa/fortune:args
    args: ["2"]
    name: html-generator
    volumeMounts:
    - name: html
      mountPath: /var/htdocs
  - image: nginx:alpine
    name: web-server
    volumeMounts:
    - name: html
      mountPath: /usr/share/nginx/html
      readOnly: true
    ports:
    - containerPort: 80
      protocol: TCP
  volumes:
  - name: html
emptyDir: {}看到配置文件中的args字段了么?这个就是传给镜像luksa/fortune:args控制时间的参数,让我们启动看看吧。
kubectl create -f fortune-pod-args.yaml
# 输出
pod/fortune2s created

# 查看状态
kubectl get pods
# 输出
NAME      READY   STATUS    RESTARTS   AGE
fortune   2/2     Running   0          2m27s

# 暂时服务化
kubectl port-forward fortune2s 8080:80访问127.0.0.1:8080就会发现输出的频率变成了2s:
> curl 127.0.0.1:8080
Stay away from flying saucers today.
设置环境变量
与容器的命令和参数设置相同,环境变量列表无法在pod创建后被修改
设置环境变量非常简单,我们只需要在pod中指定环境变量即可;当然,这里有个前提是你需要将修改镜像让其支持读取环境变量。
我们直接使用书中的例子:vim fortune-pod-env.yaml:
apiVersion: v1
kind: Pod
metadata:
  name: fortune-env
spec:
  containers:
  - image: luksa/fortune:env
    env:
    - name: INTERVAL
      value: "30"
    name: html-generator
    volumeMounts:
    - name: html
      mountPath: /var/htdocs
  - image: nginx:alpine
    name: web-server
    volumeMounts:
    - name: html
      mountPath: /usr/share/nginx/html
      readOnly: true
    ports:
    - containerPort: 80
      protocol: TCP
  volumes:
  - name: html
emptyDir: {}可以看到配置中声明了INTERVAL环境变量值为30,在终端中实践一下:
kubectl create -f fortune-pod-env.yaml
# 输出
pod/fortune-env created

# 查看状态
kubectl get pods
# 输出
NAME      READY   STATUS    RESTARTS   AGE
fortune-env   2/2     Running   0          10s

# 暂时服务化
kubectl port-forward fortune-env 8080:80访问127.0.0.1:8080就会发现输出的频率变成了30s。
现在应用程序的所有配置基本上可以说是硬编码的形式进行配置,并且yaml配置文件总是有配置相关的字段,有没有办法让镜像和配置文件解耦呢?
k8s提供了名为ConfigMap的资源对象解决这个问题。
ConfigMap
资源对象ConfigMap提供了向容器中注入配置信息的机制,它本质上就是一个键/值对映射,可以用来保存单个值或者配置文件。
ConfigMap是不需要被读取的,它映射的内容通过环境变量或者卷文件的形式传给容器。一般直接在pod的定义里面就可以声明ConfigMap,这样就可以根据不同的环境创建不同的配置,流程交互如下图所示:

创建
还是用之前应用程序为例,配置专注于环境变量INTERVAL,创建命令如下所示:
kubectl create configmap fortune-config --from-literal=sleep-interval=25
# 输出
configmap/fortune-config created

# 获取相关描述
kubectl get configmap fortune-config -o yaml

# 查看 configmap
kubectl get configmap

# 删除
kubectl delete configmap fortune-config此外,k8s还可以直接填写配置文件来进行创建vim fortune-config.yaml,输入如下内容:
apiVersion: v1
kind: ConfigMap
metadata:
  name: fortune-config
data:
  sleep-interval: "25"
然后执行:
kubectl create -f fortune-config.yaml
# 输出
configmap/fortune-config created
其实还有更多的创建方式,大概提一下:
# 从文件内容创建ConfigMap条目
kubectl create configmap my-config --from-file=config-file.conf
# 从文件夹创建ConfigMap
kubectl create configmap my-config --from-file=/path/to/dir
# 合并不同选项
kubectl create configmap my-config
    --from-file=foo.json
    --from-file=bar=foobar.conf
    --from-file=config-opts/
    --from-literal=some=thing
作为环境变量传入容器
如何将映射中的值传递给pod的容器?最简单的方法是给容器设置环境变量,通过在配置中声明valueFrom,具体操作vim fortune-pod-env-configmap.yaml:
apiVersion: v1
kind: Pod
metadata:
  name: fortune-env-from-configmap
spec:
  containers:
  - image: luksa/fortune:env
    env:
    - name: INTERVAL
      valueFrom:
        configMapKeyRef:
          name: fortune-config
          key: sleep-interval
    name: html-generator
    volumeMounts:
    - name: html
      mountPath: /var/htdocs
  - image: nginx:alpine
    name: web-server
    volumeMounts:
    - name: html
      mountPath: /usr/share/nginx/html
      readOnly: true
    ports:
    - containerPort: 80
      protocol: TCP
  volumes:
  - name: html
    emptyDir: {}
让我们启动pod实践看看:
kubectl create -f fortune-pod-env-configmap.yaml
# 输出
pod/fortune-env-from-configmap created

# 查看状态
kubectl get pods
# 输出
NAME                         READY   STATUS    RESTARTS   AGE
fortune-env-from-configmap   2/2     Running   0          19s

# 暂时服务化
kubectl port-forward fortune-env-from-configmap 8080:80

# 删除pod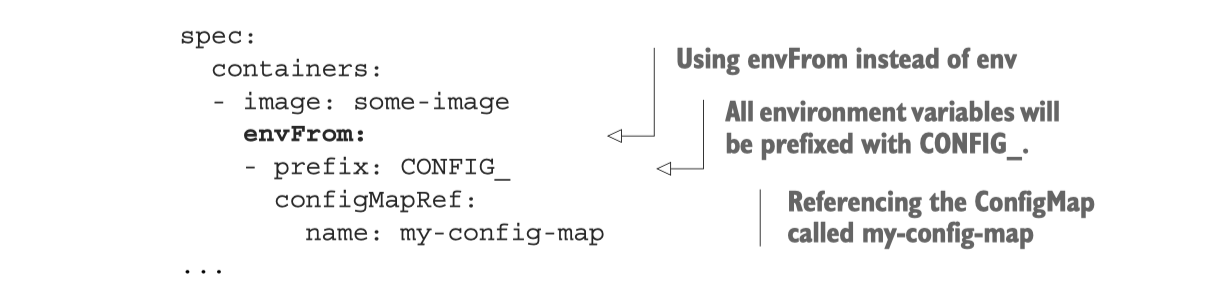
kubectl delete pods fortune-env-from-configmap现在我们已经成功在pod中使用了ConfigMap资源,不过这种使用方式是比较低效的,考虑这样一个情况:如果环境变量比较多,这样单独一个个环境变量的设置方式是个程序员都没法忍受的,一般在框架里面加载一些环境变量都会利用前缀机制来进行批量加载。
k8s也提供了这样类似的机制,配置声明如下图示:
ConfigMap卷
环境变量或者命令行参数值作为配置值通常适用于变量值较短的场景。由于ConfigMap中可以包含完整的配置文件内容,当你想要将其暴露给容器时,可以借助前面章节提到过的一种称为configMap卷的特殊卷格式。
首先删除前面声明建立的cf资源:kubectl delete configmap fortune-config。然后建立文件夹configmap-files,首先建立Nginx配置文件:vim my-nginx-config.conf:
server {
    listen              80;
    server_name         www.kubia-example.com;

    gzip on;
    gzip_types text/plain application/xml;

    location / {
        root   /usr/share/nginx/html;
        index  index.html index.htm;
    }

}另外在该文件夹中添加一个名为sleep-interval的文本文件,输入25,类似前面声明环境变量。
接下来从文件夹创建ConfigMap:
kubectl create configmap fortune-config --from-file=configmap-files
# 输出
configmap/fortune-config created

# 验证
kubectl get configmap fortune-config -o yaml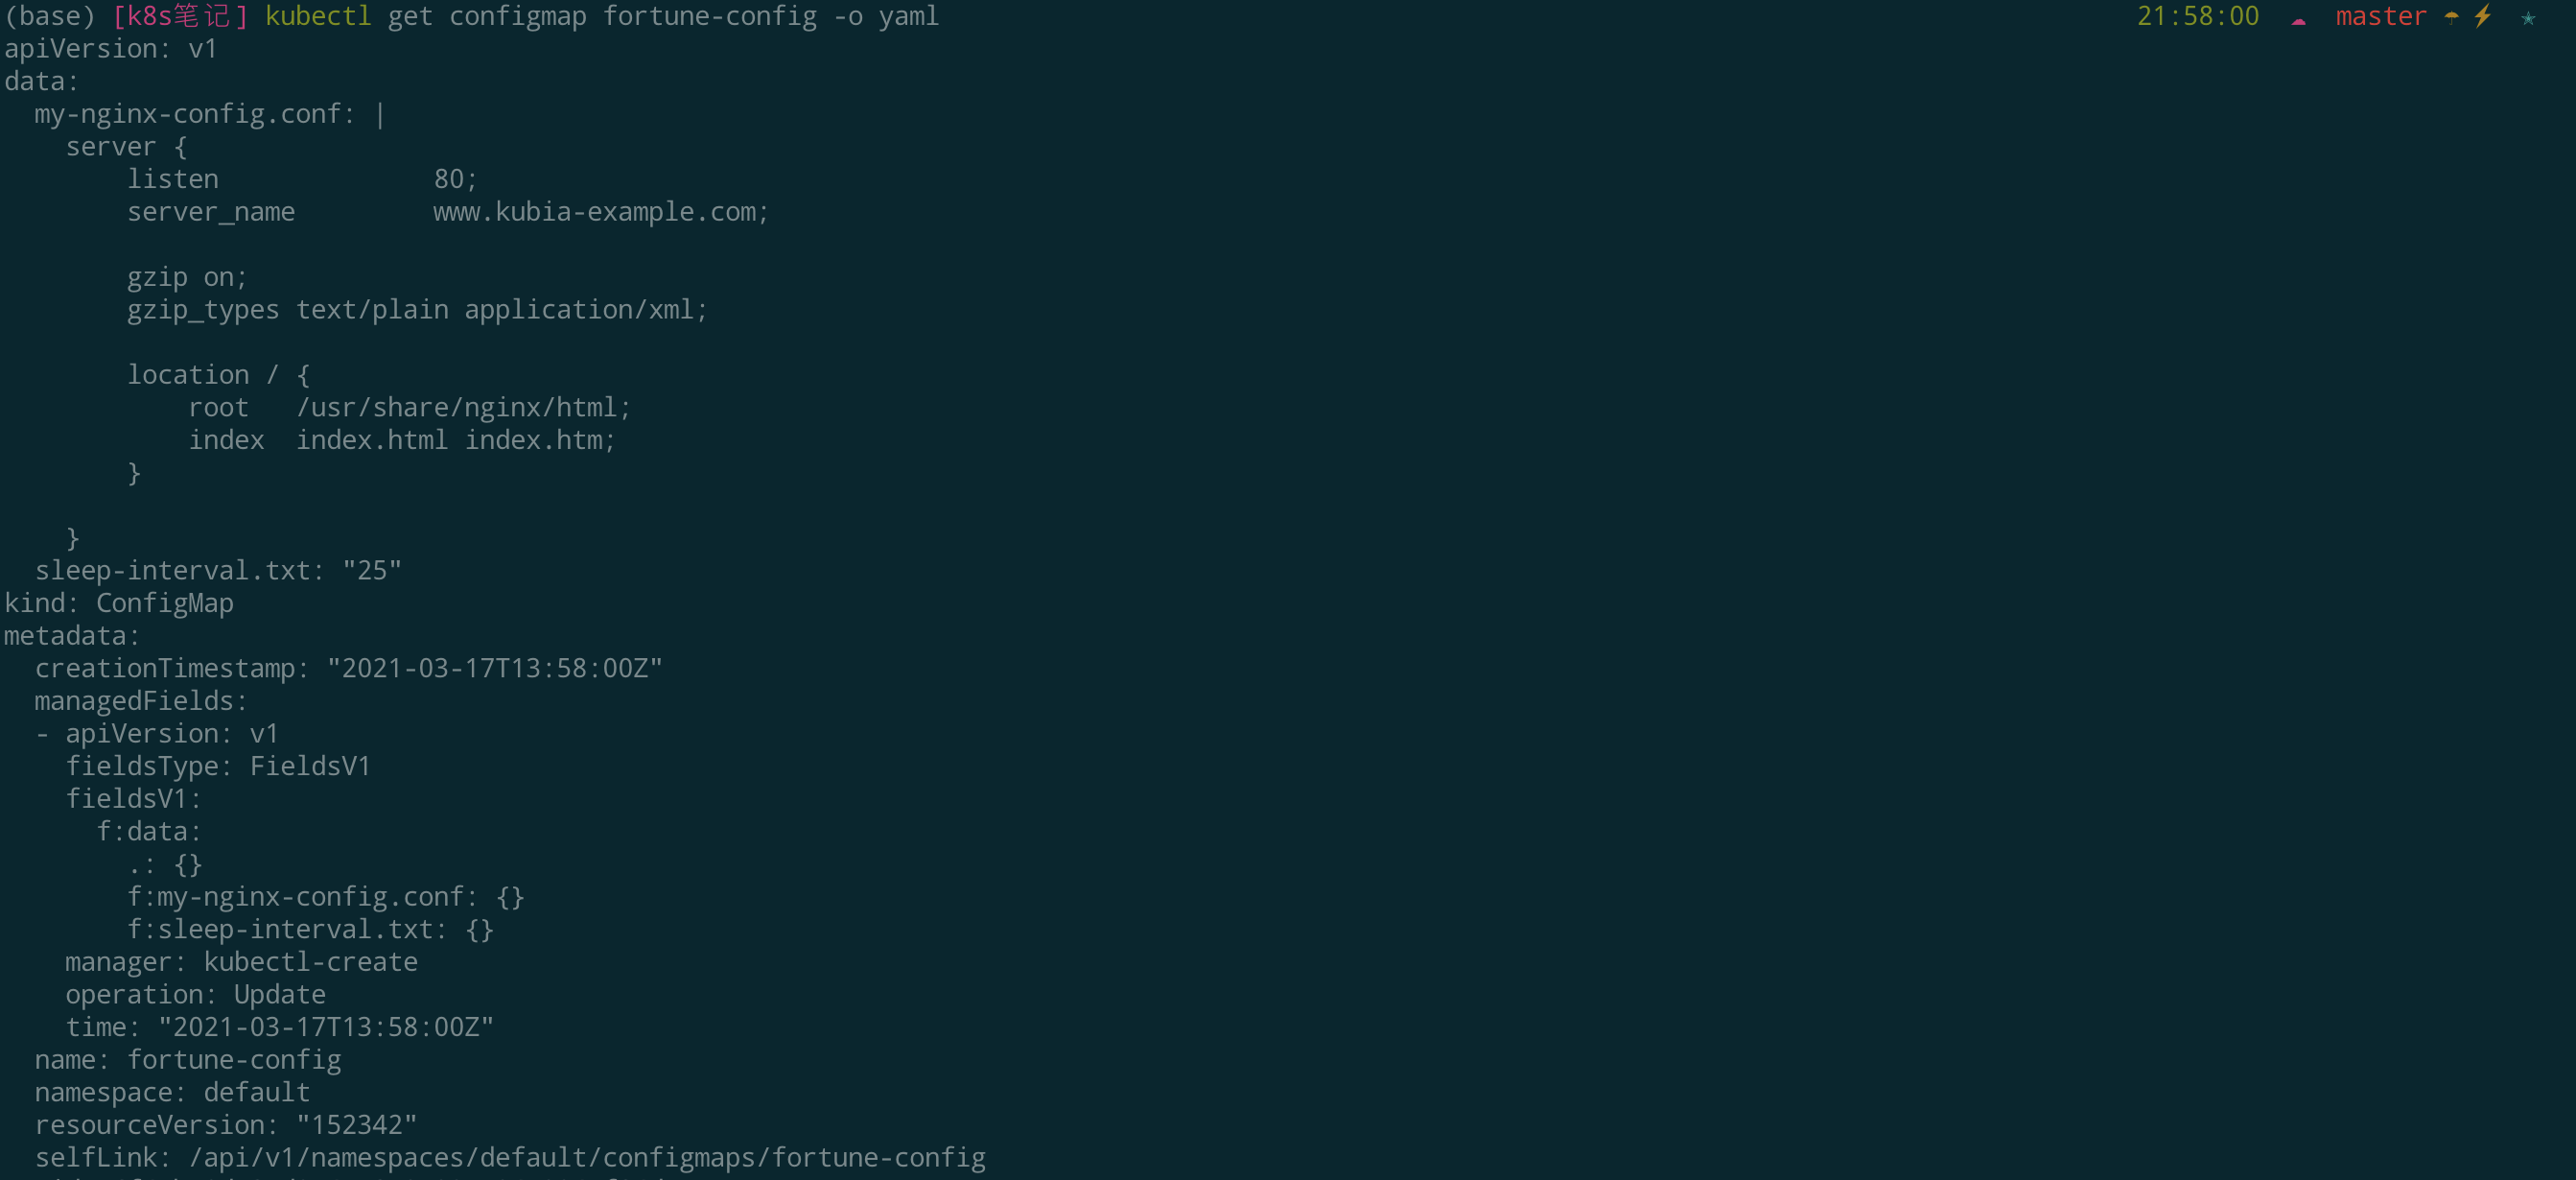
创建包含ConfigMap条目内容的卷只需要创建一个引用ConfigMap名称的卷并挂载到容器中:
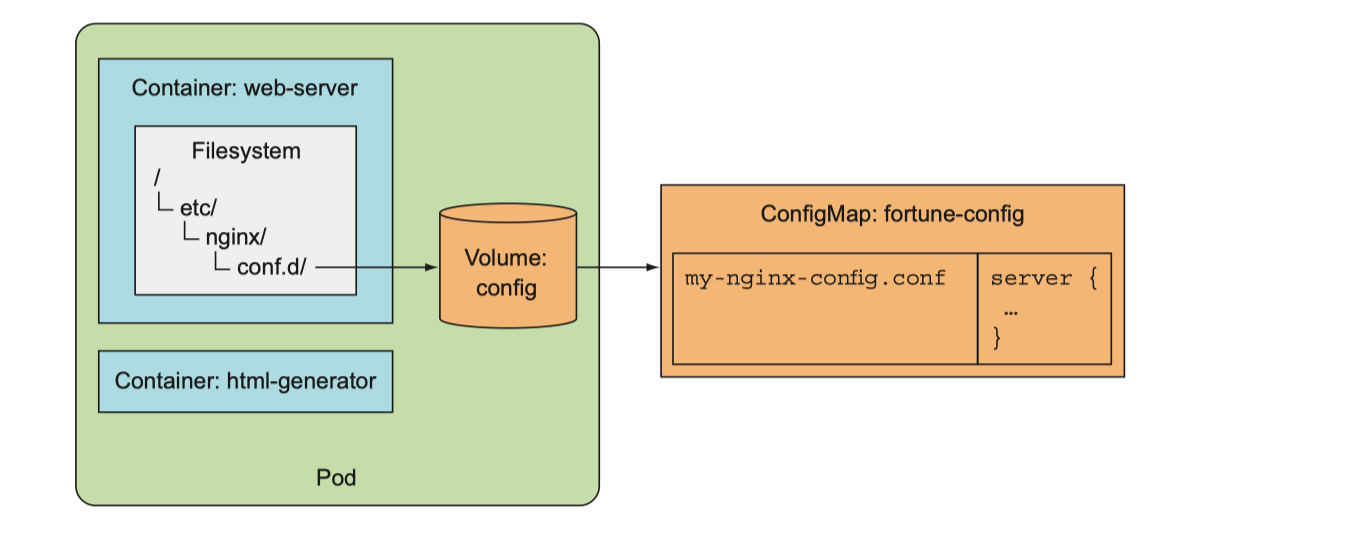
创建配置文件:vim fortune-pod-configmap-volume.yaml,输入如下内容:
apiVersion: v1
kind: Pod
metadata:
  name: fortune-configmap-volume
spec:
  containers:
  - image: luksa/fortune:env
    env:
    - name: INTERVAL
      valueFrom:
        configMapKeyRef:
          name: fortune-config
          key: sleep-interval
    name: html-generator
    volumeMounts:
    - name: html
      mountPath: /var/htdocs
  - image: nginx:alpine
    name: web-server
    volumeMounts:
    - name: html
      mountPath: /usr/share/nginx/html
      readOnly: true
    - name: config
      mountPath: /etc/nginx/conf.d
      readOnly: true
    - name: config
      mountPath: /tmp/whole-fortune-config-volume
      readOnly: true
    ports:
      - containerPort: 80
        name: http
        protocol: TCP
  volumes:
  - name: html
    emptyDir: {}
  - name: config
    configMap:
      name: fortune-config
Secret
前面说的,都是针对非敏感信息的配置数据,对于一些敏感数据,例如:密码、OAuth token、ssh 密钥等,就可以使用Secret资源了。
Secret结构和使用方法都与ConfigMap类似,其作用就是将加密数据放到etcd中,然后k8s将Secret分发到对应pod所在机器节点来保障其安全性。另外,Secret只会存储在节点的内存中,永不写入物理存储。
创建
以创建一个包含用户名密码的secret资源为例:
# 创建文件
echo -n 'admin' > ./username.txt
echo -n '1f2d1e2e67df' > ./password.txt

# 单独创建
kubectl create secret generic user --from-file=./username.txt
kubectl create secret generic pass --from-file=./password.txt

# 批量创建资源
kubectl create secret generic db-user-pass --from-file=./username.txt --from-file=./password.txt

# 输出
secret/db-user-pass created

# 查看
kubectl get secrets

# 输出
NAME                  TYPE                                  DATA   AGE
db-user-pass          Opaque                                2      6h48m
default-token-nlxkq   kubernetes.io/service-account-token   3      2d
pass                  Opaque                                1      7s
user Opaque 1 10sdb-user-pass很好理解,就是刚才创建的secret资源,default-token-nlxkq是什么呢?这是一种默认被挂载至所有容器的Secret。
这里同样也可以是用yaml文件形式创建,先将用户名密码进行基础的Base64转码:
echo -n 'admin' | base64
echo -n '1f2d1e2e67df' | base64
vim db-user-pass-secret.yaml:
apiVersion: v1
kind: Secret
metadata:
  name: db-user-pass
type: Opaque
data:
  user: YWRtaW4=
  pass: MWYyZDFlMmU2N2Rm
终端执行:
# 启动
kubectl create -f db-user-pass-secret.yaml

# 查看
kubectl get secrets

# 输出
NAME                  TYPE                                  DATA   AGE
db-user-pass          Opaque                                2      15s
default-token-ds2lv   kubernetes.io/service-account-token   3      41h

# 删除
kubectl delete secrets db-user-pass
使用
利用投射数据卷在Pod中使用Secret,编辑配置文件vim test-projected-volume.yaml:
apiVersion: v1
kind: Pod
metadata:
  name: test-projected-volume
spec:
  containers:
  - name: test-secret-volume
    image: busybox
    args:
    - sleep
    - "86400"
    volumeMounts:
    - name: mysql-cred
      mountPath: "/projected-volume"
      readOnly: true
  volumes:
  - name: mysql-cred
    projected:
      sources:
      - secret:
          name: user
      - secret:
          name: pass
终端执行:
# 启动
kubectl create -f test-projected-volume.yaml

# 查看
kubectl get pods -o wide

# 输出
NAME                    READY   STATUS    RESTARTS   AGE
test-projected-volume   1/1     Running   0          37s

# 查看数据
kubectl exec -it test-projected-volume -- /bin/sh

> ls /projected-volume/
> cat /projected-volume/username.txt

# 删除
kubectl delete pods test-projected-volume
参考
本章关于配置应用程序就介绍到这里了,谢谢!本部分内容有参考如下文章:
- 配置 Pod 使用 ConfigMap
- Secret概述
- Kubernetes in Action中文版:可以算是第7章的读书笔记