本文最后更新于 704 天前,其中的信息可能已经过时,如有错误请发送邮件到wuxianglongblog@163.com
配置filebeat实战案例
一.filebeat的输入源(input)配置案例
1.从标准输入读取数据
[root@elk101.oldboyedu.com ~/conf]# vim stdin-to-console.yaml
[root@elk101.oldboyedu.com ~/conf]#
[root@elk101.oldboyedu.com ~/conf]# cat stdin-to-console.yaml
filebeat.inputs:
- type: stdin
  enabled: true

output.console:
  pretty: true
  enable: true
[root@elk101.oldboyedu.com ~/conf]#
[root@elk101.oldboyedu.com ~/conf]# filebeat -e -c stdin-to-console.yaml
2.从文件中读取数据
[root@elk101.oldboyedu.com ~/conf]# vim file-to-console.yaml
[root@elk101.oldboyedu.com ~/conf]#
[root@elk101.oldboyedu.com ~/conf]# cat file-to-console.yaml
filebeat.inputs:
- type: log
  paths:
    - /oldboyedu/logs/linux77/*.log
  include_lines: ['oldboyedu']
  fields:
    school: oldboyedu
    class: linux77
    address: ["北京沙河","上海","深圳"]
  tags: ["oldboyedu-linux77","历史最优班级"]

- type: log
  paths:
    - /oldboyedu/logs/linux77/linux77.txt
  exclude_lines: ['^linux']
  fields:
    school: oldboyedu
    class: linux77
    address: ["北京沙河","上海","深圳"]
  fields_under_root: true
  tags: ["历史最优班级 oldboyedu linux77"]

output.console:
  pretty: true
[root@elk101.oldboyedu.com ~/conf]#
[root@elk101.oldboyedu.com ~/conf]# filebeat -e -c file-to-console.yaml

推荐阅读:
    https://www.elastic.co/guide/en/beats/filebeat/current/filebeat-input-log.html
3.从tcp类型读取数据
vim 02-tcp-to-console.yml
filebeat.inputs:
- type: tcp
  max_message_size: 10MiB
  host: "10.0.0.106:7777"
  timeout: 10

output.console:
  pretty: true
  bulk_max_size: 10MiB

推荐阅读:
    https://www.elastic.co/guide/en/beats/filebeat/current/filebeat-input-tcp.html
4.从redis类型读取数据[从慢日志中读取,目前是测试阶段]
(1)启动redis
cat > /oldboyedu/softwares/redis/redis16379.conf << EOF
port 16379
daemonize yes
bind 10.0.0.108
requirepass "oldboyedu_linux77"
slowlog-max-len=1
slowlog-log-slower-than=1000
EOF
redis-server /oldboyedu/softwares/redis/redis16379.conf

(2)链接redis进行测试
redis-cli -h 10.0.0.108 -p 16379 -a oldboyedu_linux77

(3)编写filebeat的配置文件
filebeat.inputs:
- type: redis
  hosts: ["10.0.0.108:16379"]
  network: tcp4
  password: "oldboyedu_linux77"
  timeout: 3

output.console:
  pretty: true

温馨提示:
    filebeat会从redis的慢日志中读取数据,但可能课上无法模拟出慢查询操作!等待完善....

推荐阅读:
    https://www.elastic.co/guide/en/beats/filebeat/current/filebeat-input-redis.html
5.从kafka类型读取数据
(1)启动kafka集群
    略.

(2)创建topic
kafka-topics.sh --bootstrap-server 10.0.0.108:9092 --create --topic oldboyedu-linux77 --partitions 10 --replication-factor 3

(3)查看topic
kafka-topics.sh --bootstrap-server 10.0.0.108:9092 --list

(4)查看消费者组
kafka-consumer-groups.sh --bootstrap-server 10.0.0.108:9092 --list

(5)启动生产者
kafka-console-producer.sh --bootstrap-server 10.0.0.108:9092 --topic oldboyedu-linux77

(6)编写filebeat的配置文件并启动
filebeat.inputs:
- type: kafka
  hosts:
    - 10.0.0.108:9092
    - 10.0.0.107:9092
    - 10.0.0.106:9092
  topics: ["oldboyedu-linux77"]
  group_id: "oldboyedu-filebeat"

output.console:
  pretty: true

(7)再次查看消费者组
kafka-consumer-groups.sh --bootstrap-server 10.0.0.108:9092 --list

推荐阅读:
    https://www.elastic.co/guide/en/beats/filebeat/current/filebeat-input-kafka.html
二.filebeat的输出源配置案例
1.将数据输出到kafka:star:
(1)启动kafka集群
    略.

(2)配置filebeat并启动
filebeat.inputs:
- type: tcp
  max_message_size: 10MiB
  host: "10.0.0.106:7777"

output.kafka:
  # 指定主机
  hosts: ["10.0.0.106:9092", "10.0.0.107:9092", "10.0.0.108:9092"]

  # 指定topic
  topic: 'oldboyedu_linux77_2021'

(3)启动消费者查看数据
kafka-console-consumer.sh --bootstrap-server 10.0.0.108:9092 --topic oldboyedu_linux77_2021 --from-beginning

推荐阅读:
    https://www.elastic.co/guide/en/beats/filebeat/current/kafka-output.html
2.将数据输出到file
filebeat.inputs:
- type: tcp
  max_message_size: 10MiB
  host: "10.0.0.106:7777"

output.file:
  path: "/tmp/oldboyedu_linux77_filebeat"
  filename: linux77.log

推荐阅读:
    https://www.elastic.co/guide/en/beats/filebeat/current/file-output.html
3.将数据输出到redis
(1)编写配置文件并启动filebeat
filebeat.inputs:
- type: tcp
  max_message_size: 10MiB
  host: "10.0.0.106:7777"

output.redis:
  hosts: ["10.0.0.108:16379"]
  password: "oldboyedu_linux77"
  key: "oldboyedu-filebeat"
  db: 10
  timeout: 5

(2)查看数据的内容
redis-cli -h 10.0.0.108 -p 16379 -a oldboyedu_linux77 --raw -n 10 LRANGE oldboyedu-filebeat 0 -1

推荐阅读:
    https://www.elastic.co/guide/en/beats/filebeat/current/redis-output.html
4.输出到ES:star:
filebeat.inputs:
- type: tcp
  max_message_size: 10MiB
  host: "10.0.0.106:7777"

output.elasticsearch:
  hosts:
    - "http://10.0.0.106:9200"
    - "http://10.0.0.107:9200"
    - "http://10.0.0.108:9200"

  index: "oldboyedu-linux77-filebeat-%{+yyyy.MM.dd}"

# 禁用索引生命周期并设置索引的模板!
setup.ilm.enabled: false
setup.template.name: "oldboyedu-linux77-filebeat"
setup.template.pattern: "oldboyedu-linux77-*"
setup.template.overwrite: true
setup.template.settings:
  index.number_of_shards: 10
  index.number_of_replicas: 0

推荐阅读:
    https://www.elastic.co/guide/en/beats/filebeat/current/elasticsearch-output.html
    https://www.elastic.co/guide/en/beats/filebeat/current/configuration-template.html
    https://www.elastic.co/guide/en/beats/filebeat/current/ilm.html
三.Filebeat Module的基本使用(了解即可)
1.查看默认的module
    前面要实现日志数据的读取以及处理都是自己手动设置的,是不是感觉是有点烦呀?

    其实,在filebeat中,有大量的Modele,可以简化我们的配置,直接就可以使用。
2.查看filebeat已启用和已经禁用的模块
[root@elk101.oldboyedu.com /oldboy/softwares/filebeat]# filebeat modules list
    Enabled:
        已经启用的模块。

    Disabled:
        没有启用的模块。

温馨提示:
    可以看到,内置了很多的module,但是都没有启用,如果需要启用需要进行enable操作。
3.启用模块和禁用模块
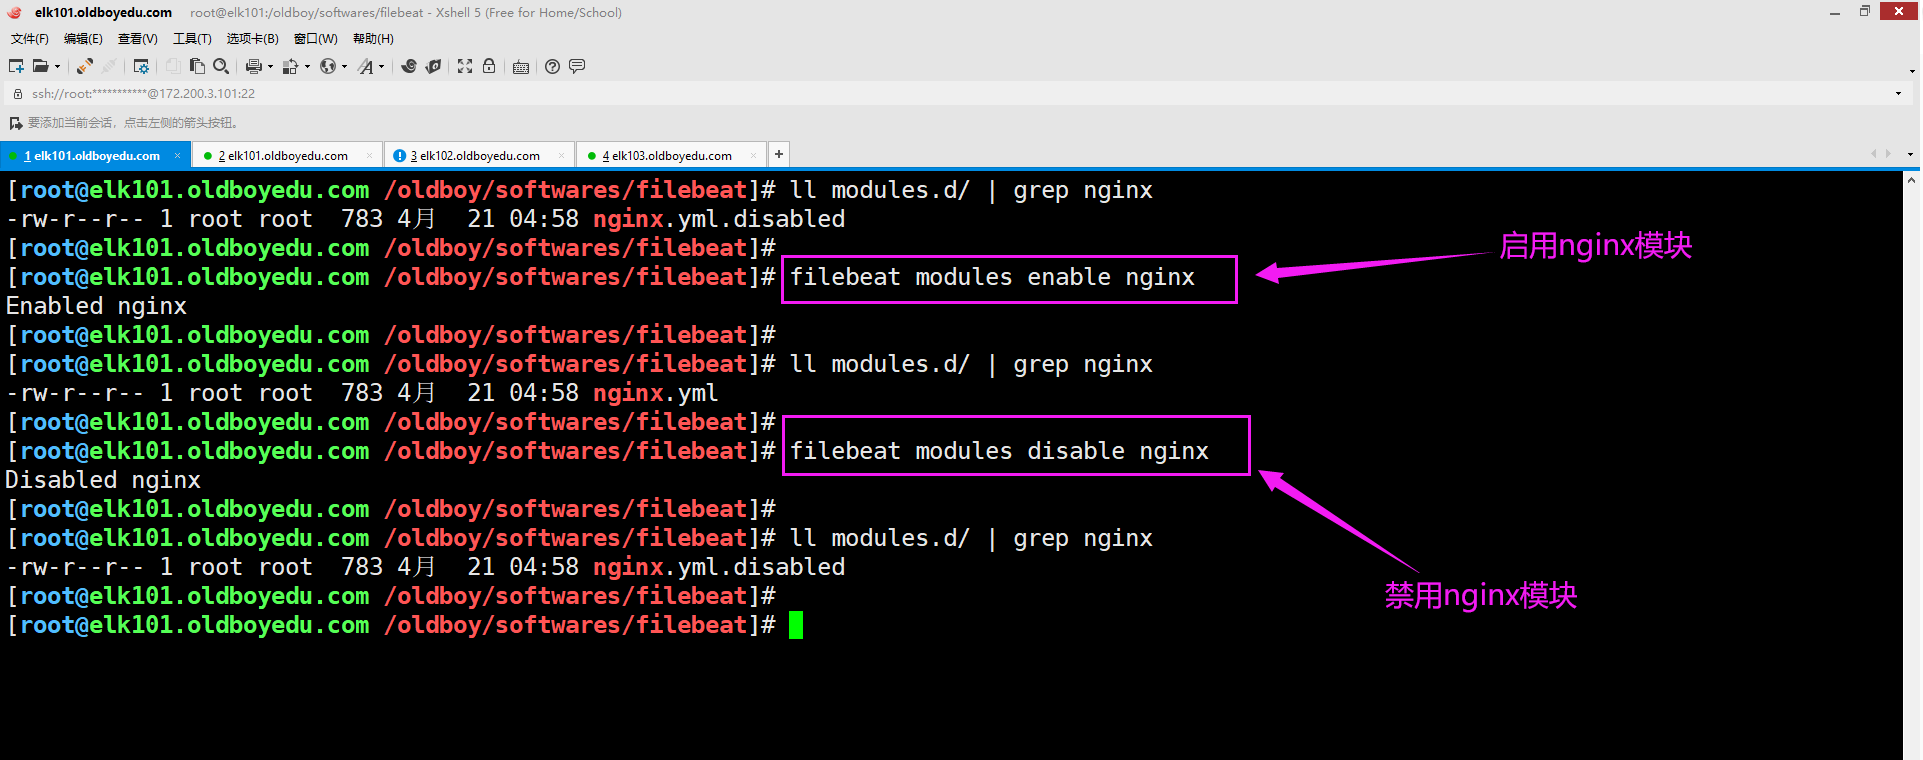
    启用模块:
        [root@elk101.oldboyedu.com /oldboy/softwares/filebeat]# filebeat modules enable nginx

    禁用模块:
        [root@elk101.oldboyedu.com /oldboy/softwares/filebeat]# filebeat modules disable nginx

    温馨提示:
        如下图所示,启用或者禁用模块,会修改对应的配置文件后缀哟~
4.配置nginx module文件
[root@elk101.oldboyedu.com /oldboy/softwares/filebeat]# egrep -v "^*#|^$" modules.d/nginx.yml
- module: nginx
  access:
    enabled: true
  error:
    enabled: true
  ingress_controller:
    enabled: false
[root@elk101.oldboyedu.com /oldboy/softwares/filebeat]#
[root@elk101.oldboyedu.com /oldboy/softwares/filebeat]# vim modules.d/nginx.yml
[root@elk101.oldboyedu.com /oldboy/softwares/filebeat]#
[root@elk101.oldboyedu.com /oldboy/softwares/filebeat]# egrep -v "^*#|^$" modules.d/nginx.yml
- module: nginx
  access:
    enabled: true
    var.paths: ["/var/log/nginx/access.log*"]
  error:
    enabled: true
    var.paths: ["/var/log/nginx/error.log*"]
  ingress_controller:
    enabled: false
[root@elk101.oldboyedu.com /oldboy/softwares/filebeat]#

温馨提示:
    (1)我们指定的"access.log*"和"error.log*",目的是通配所有的日志文件,生产环境中都会配置日志滚动;
    (2)关于启用module的使用也可以基于命令行的方式使用哟,只需启动的时候使用"-M"参数指定即
可;

推荐阅读:
    https://www.elastic.co/guide/en/beats/filebeat/current/filebeat-module-nginx.html
5.配置filebeat实例并引用上面配置的模块
[root@elk101.oldboyedu.com /oldboy/softwares/filebeat]# vim module-to-es.yaml
[root@elk101.oldboyedu.com /oldboy/softwares/filebeat]#
[root@elk101.oldboyedu.com /oldboy/softwares/filebeat]# cat module-to-es.yaml
# 指定filebeat的输入信息,我们不做任何配置,因为下面我们使用了modules。
filebeat.inputs:

# 指定filebeat输出类型
output.elasticsearch:
  hosts: ["elk101.oldboyedu.com:9200","elk102.oldboyedu.com:9200","elk103.oldboyedu.com:9200"]
  index: "oldboy-module-%{[agent.version]}-%{+yyyy.MM.dd}"

# 禁用索引的生命周期!
setup.ilm.enabled: false
# 指定索引模板的名称
setup.template.name: "oldboyedu"
# 指定索引模板的匹配模式
setup.template.pattern: "oldboy-module-*"
# 指定索引模板的分片信息
setup.template.settings:
  index.number_of_shards: 5
  index.number_of_replicas: 0

# 启用modules
filebeat.config.modules:
  path: ${path.config}/modules.d/*.yml
  reload.enabled: false
[root@elk101.oldboyedu.com /oldboy/softwares/filebeat]#
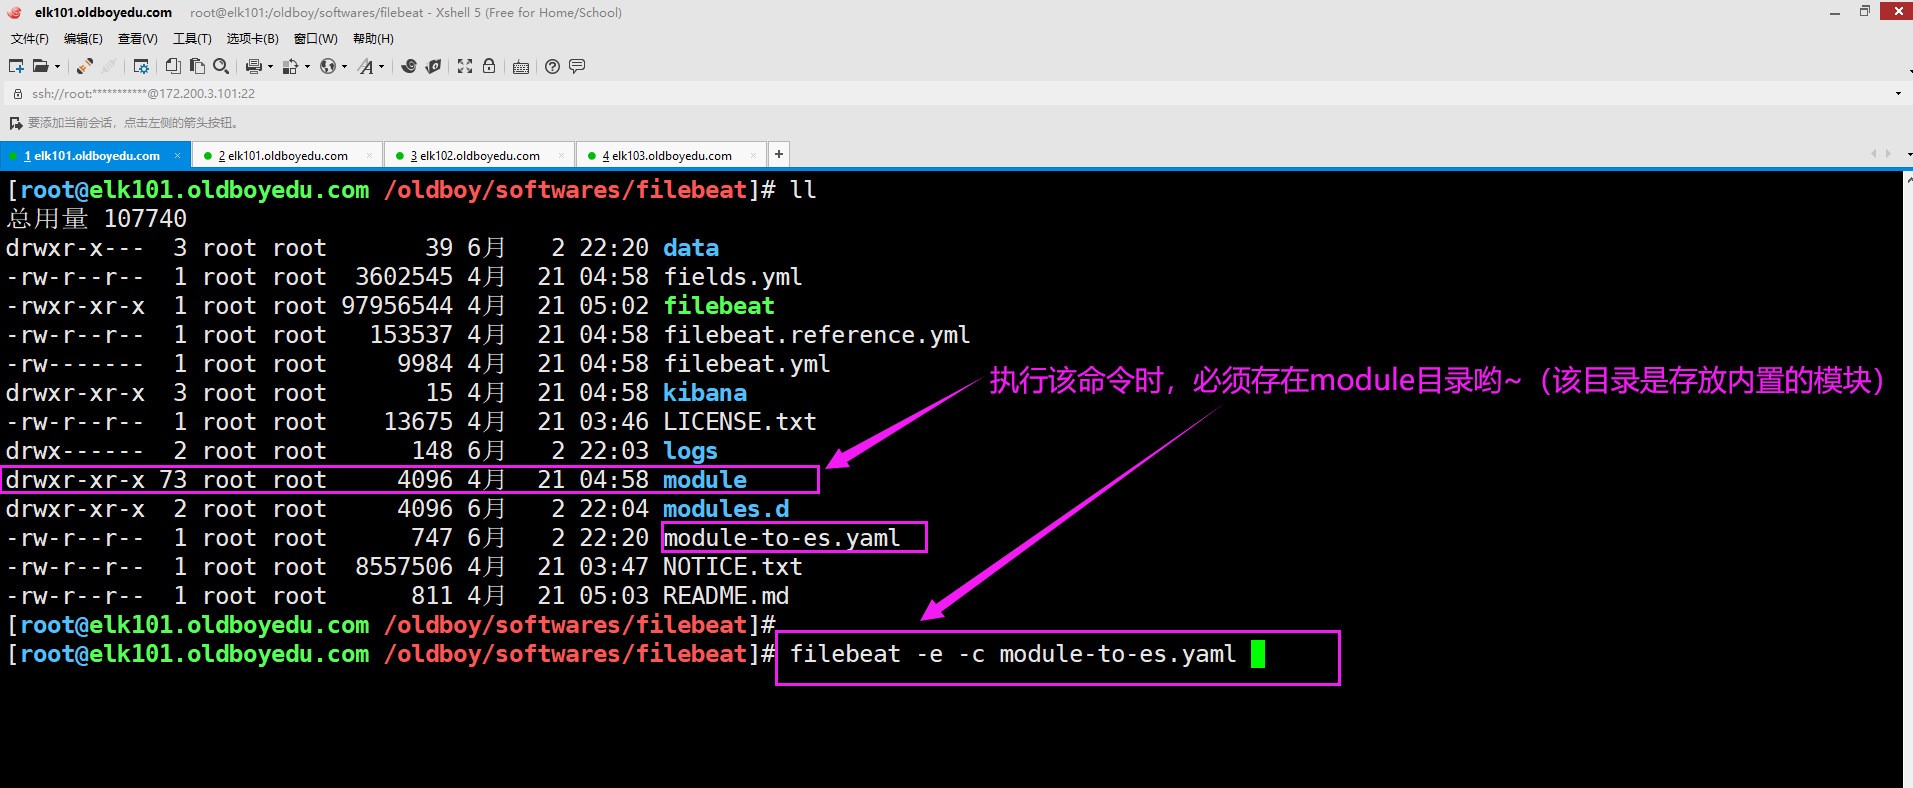
[root@elk101.oldboyedu.com /oldboy/softwares/filebeat]# filebeat -e -c module-to-es.yaml

温馨提示:
    注意哈,如果我们在执行filebeat时,若不存在module目录,则你会发现ES始终无法收到数据哟~

四.可能会遇到的报错
1.Exiting: setup.template.name and setup.template.pattern have to be set
if index name is modified
报错原因:
    未设置模板名称("setup.template.name")和模板的匹配方式("setup.template.pattern")。

解决方案:
    setup.ilm.enabled: false
    setup.template.name: "syslog"
    setup.template.pattern: "syslog-*"
2.配置指定分片无效
报错原因:
    如下所示,配置的分片设置无效。
        setup.template.settings:
          index.number_of_shards: 5
          index.number_of_replicas: 1

解决方案1:
    检查是否有之前的索引模板未删除,如果未删除,则可用删除索引模板。然后重新启动索引。

解决方案2:
    检查是否有之前的索引模板未删除,如果未删除,则可用直接对该索引模板进行修改,从而达到我们的目的。
3.Exiting: data path already locked by another beat. Please make sure that multiple beats are not sharing the same data path (path.data).
报错原因:
    启动了多个beats组件监听了相同的路径。

解决方案:
    检查配置文件,是否该配置文件配置的路径是否被其他beat实例监听了。