并发包
1.ConcurrentHashMap
为什么要使用ConcurrentHashMap:
- HashMap线程不安全,会导致数据错乱
- 使用线程安全的Hashtable效率低下
基于以上两个原因,便有了ConcurrentHashMap的登场机会。
HashMap线程不安全演示
公有、静态的集合:
public class Const {
    public static HashMap<String,String> map = new HashMap<>();
}
线程,向map中写入数据:
public void run() {
        for (int i = 0; i < 500000; i++) {
            Const.map.put(this.getName() + (i + 1), this.getName() + i + 1);
        }
        System.out.println(this.getName() + " 结束!");
    }
测试类:
public class Demo {
public static void main(String[] args) throws InterruptedException {
Thread1A a1 = new Thread1A();
Thread1A a2 = new Thread1A();
a1.setName("线程1-");
a2.setName("线程2-");
a1.start();
a2.start();
//休息10秒,确保两个线程执行完毕
Thread.sleep(1000 * 5);
//打印集合大小
System.out.println("Map大小:" + Const.map.size());
}
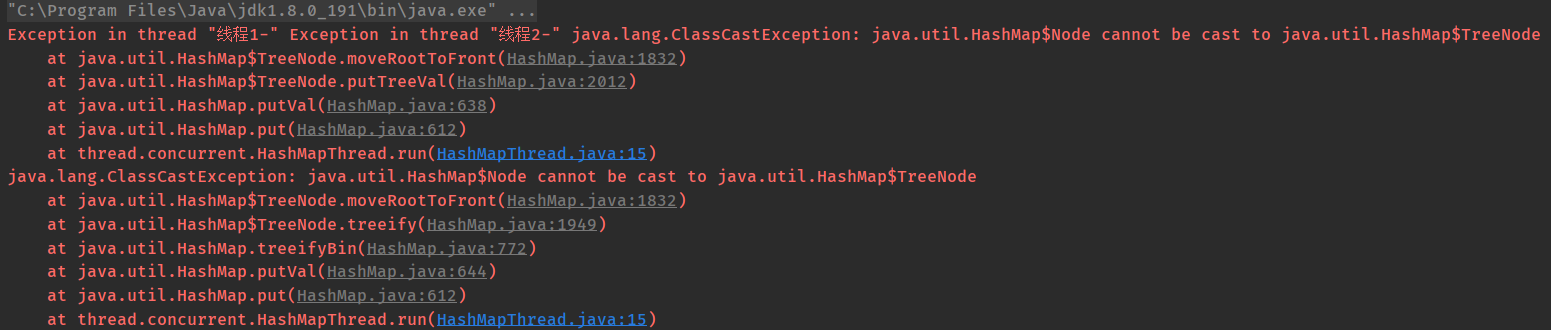
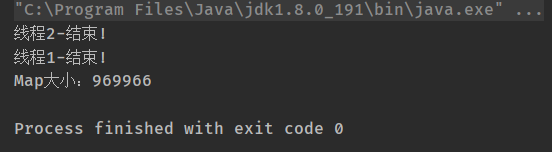
}说明:两个线程分别向同一个map中写入500000个键值对,最后map的size应为:1000000,但多运行几次会发现有以下几种错误:
-
假死:

-
异常:
-
错误结果:

Hashtable线程安全演示
为了保证线程安全,可以使用Hashtable。注意:线程中加入了计时
公有、静态的集合:
public class Const {
    public static Hashtable<String,String> map = new Hashtable<>();
}
线程,向map中写入数据:
public void run() {
        long start = System.currentTimeMillis();
        for (int i = 0; i < 500000; i++) {
            Const.map.put(this.getName() + (i + 1), this.getName() + i + 1);
        }
        long end = System.currentTimeMillis();
        System.out.println(this.getName() + " 结束!用时:" + (end - start) + " 毫秒");
    }
测试类:
public class Demo {
public static void main(String[] args) throws InterruptedException {
Thread1A a1 = new Thread1A();
Thread1A a2 = new Thread1A();
a1.setName("线程1-");
a2.setName("线程2-");
a1.start();
a2.start();
//休息10秒,确保两个线程执行完毕
Thread.sleep(1000 * 5);
//打印集合大小
System.out.println("Map大小:" + Const.map.size());
}
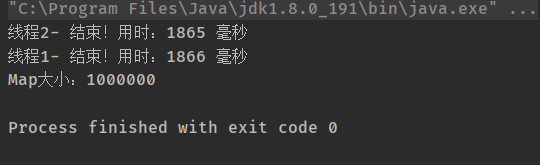
}执行结果:
ConcurrentHashMap
公有、静态的集合:
public class Const {
    public static ConcurrentHashMap<String,String> map = new ConcurrentHashMap<>();
}
线程,向map中写入数据:
public void run() {
        long start = System.currentTimeMillis();
        for (int i = 0; i < 500000; i++) {
            Const.map.put(this.getName() + (i + 1), this.getName() + i + 1);
        }
        long end = System.currentTimeMillis();
        System.out.println(this.getName() + " 结束!用时:" + (end - start) + " 毫秒");
    }
测试类:
public class Demo {
public static void main(String[] args) throws InterruptedException {
Thread1A a1 = new Thread1A();
Thread1A a2 = new Thread1A();
a1.setName("线程1-");
a2.setName("线程2-");
a1.start();
a2.start();
//休息10秒,确保两个线程执行完毕
Thread.sleep(1000 * 5);
//打印集合大小
System.out.println("Map大小:" + Const.map.size());
}
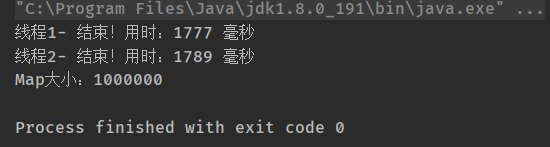
}执行结果:
ConcurrentHashMap与HashTable对比
ConcurrentHashMap与HashTable都是线程安全的,但是其实现机制有所不同,效率也有所不同,其主要区别如下:
| HashTable | ConcurrentHashMap(JDK8之前) | ConcurrentHashMap |
|---|---|---|
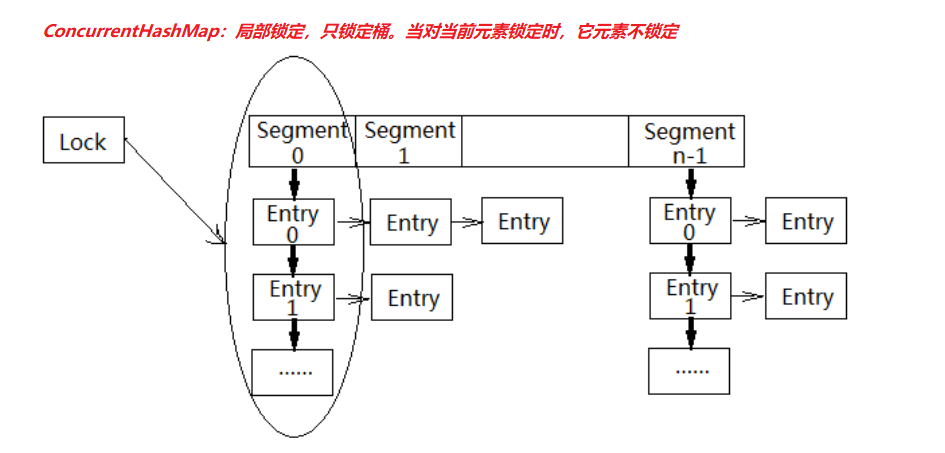
| 把所有的get、put方法加上锁实现同步 | 把数据分段,每个分段分别加锁,实现同步,提高效率 | 采用CAS算法提高效率 |
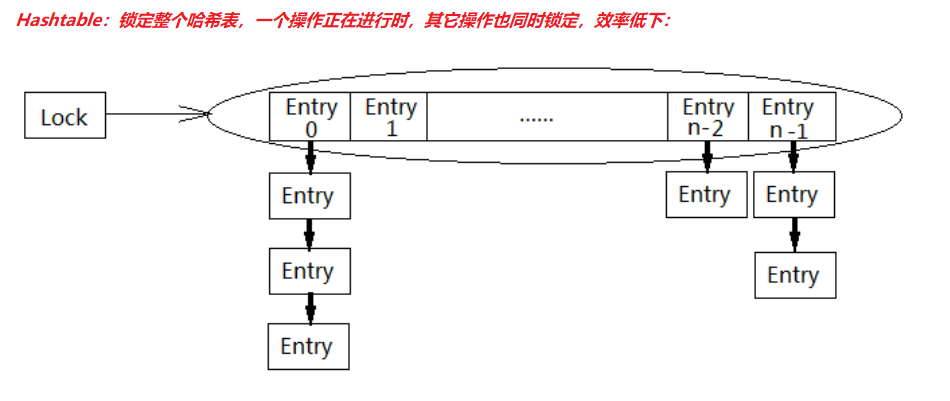
HashTable效率低下原因:
public synchronized V put(K key, V value)
public synchronized V get(Object key)
HashTable容器使用synchronized来保证线程安全,但在线程竞争激烈的情况下HashTable的效率非常低下。因为当一个线程访问HashTable的同步方法,其他线程也访问HashTable的同步方法时,会进入阻塞状态。如线程1使用put进行元素添加,线程2不但不能使用put方法添加元素,也不能使用get方法来获取元素,所以竞争越激烈效率越低。
ConcurrentHashMap高效的原因:CAS + 局部(synchronized)锁定分段式锁
为什么HashMap不是线程安全的?
HashMap在扩容的时候,元素为重新排列(同一个桶里面的元素采用的是头插入法,原来的链表顺序会被倒置),并发场景可能会形成循环链表。
为什么ConcurrentHashMap不能完全替代HashTable
因为ConcurrentHashMap是弱一致性,其get方法没有上锁,会导致get元素的并不是当前并行还未执行完的put的值,读取到的数据并不一定是最终的值,在一些要求强一致性的场景下可能会出错。例如:需要判断当前值是否为A如果不为A则修改为C,但是当前值为B而有个put方法将其更新为A还没执行完,则最终改值就是A,可能会造成后续程序或业务的异常。
2.CountDownLatch
1.概述
CountDownLatch允许一个或多个线程等待其他线程完成操作,再执行自己。
例如:线程1要执行打印:A和C,线程2要执行打印:B,但线程1在打印A后,要线程2打印B之后才能打印C,所以:线程1在打印A后,必须等待线程2打印完B之后才能继续执行。
CountDownLatch构造方法:
public CountDownLatch(int count)// 初始化一个指定计数器的CountDownLatch对象CountDownLatch重要方法:
public void await() throws InterruptedException// 让当前线程等待
public void countDown() // 计数器进行减1
2.示例
-
线程1
public class ThreadA extends Thread { private CountDownLatch down; public ThreadA(CountDownLatch down) { this.down = down; } @Override public void run() { System.out.println("A"); try { down.await(); } catch (InterruptedException e) { e.printStackTrace(); } System.out.println("C"); } } -
线程2
public class ThreadB extends Thread { private CountDownLatch down; public ThreadB(CountDownLatch down) { this.down = down; } @Override public void run() { System.out.println("B"); down.countDown(); } } -
测试类
public class Demo { public static void main(String[] args) { CountDownLatch down = new CountDownLatch(1);//创建1个计数器 new ThreadA(down).start(); new ThreadB(down).start(); } } -
执行结果
会保证按:A B C的顺序打印。
说明:CountDownLatch是通过一个计数器来实现的,每当一个线程完成了自己的任务后,可以调用countDown()方法让计数器-1,当计数器到达0时,调用CountDownLatch。await()方法的线程阻塞状态解除,继续执行。
3.CyclicBarrier
1.概述
CyclicBarrier的字面意思是可循环使用(Cyclic)的屏障(Barrier)。它要做的事情是,让一组线程到达一个屏障(也可以叫同步点)时被阻塞,直到最后一个线程到达屏障时,屏障才会开门,所有被屏障拦截的线程才会继续运行。
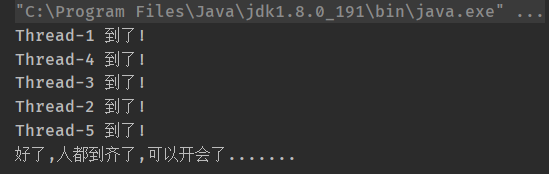
例如:公司召集5名员工开会,等5名员工都到了,会议开始。
我们创建5个员工线程,1个开会线程,几乎同时启动,使用CyclicBarrier保证5名员工线程全部执行后,再执行开会线程。
CyclicBarrier构造方法:
public CyclicBarrier(int parties, Runnable barrierAction)//用于在线程到达屏障时,优先执行barrierAction,方便处理更复杂的业务场景CyclicBarrier重要方法:
public int await()// 每个线程调用await方法告诉CyclicBarrier我已经到达了屏障,然后当前线程被阻塞2.示例
- 员工线程
public class PersonThread extends Thread {
    private CyclicBarrier cbRef;
    public PersonThread(CyclicBarrier cbRef) {
        this.cbRef = cbRef;
    }
    @Override
    public void run() {
        try {
            Thread.sleep((int) (Math.random() * 1000));
            System.out.println(Thread.currentThread().getName() + " 到了! ");
            cbRef.await();
        } catch (InterruptedException e) {
            e.printStackTrace();
        } catch (BrokenBarrierException e) {
            e.printStackTrace();
        }
    }
}- 开会线程
public class MeetingThread extends Thread {
    @Override
    public void run() {
        System.out.println("好了,人都到了,开始开会......");
    }
}- 测试类
public class Demo {
    public static void main(String[] args) {
        CyclicBarrier cbRef = new CyclicBarrier(5, new MeetingThread());//等待5个线程执行完毕,再执行MeetingThread
        PersonThread p1 = new PersonThread(cbRef);
        PersonThread p2 = new PersonThread(cbRef);
        PersonThread p3 = new PersonThread(cbRef);
        PersonThread p4 = new PersonThread(cbRef);
        PersonThread p5 = new PersonThread(cbRef);
        p1.start();
        p2.start();
        p3.start();
        p4.start();
        p5.start();
    }
}- 执行结果
3.使用场景
使用场景:CyclicBarrier可以用于多线程计算数据,最后合并计算结果的场景。
需求:使用两个线程读取2个文件中的数据,当两个文件中的数据都读取完毕以后,进行数据的汇总操作。
4.Semaphore
1.概述
Semaphore(发信号)的主要作用是控制线程的并发数量。
synchronized可以起到"锁"的作用,但某个时间段内,只能有一个线程允许执行。
Semaphore可以设置同时允许几个线程执行。
Semaphore字面意思是信号量的意思,它的作用是控制访问特定资源的线程数目。
Semaphore构造方法:
public Semaphore(int permits)              //permits 表示许可线程的数量
public Semaphore(int permits, boolean fair) //fair 表示公平性,如果这个设为 true 的话,下次执行的线程会是等待最久的线程
Semaphore重要方法:
public void acquire() throws InterruptedException   //表示获取许可
public void release()                             //release() 表示释放许可
2.示例
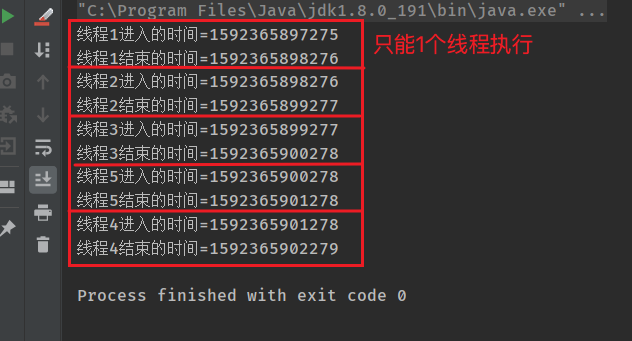
示例一:同时允许1个线程执行
-
Service类
public class Service { private Semaphore semaphore = new Semaphore(1);//1表示许可的意思,表示最多允许1个线程执行acquire()和release()之间的内容 public void testMethod() { try { semaphore.acquire(); System.out.println(Thread.currentThread().getName() + " 进入 时间=" + System.currentTimeMillis()); Thread.sleep(1000); System.out.println(Thread.currentThread().getName() + " 结束 时间=" + System.currentTimeMillis()); semaphore.release(); //acquire()和release()方法之间的代码为"同步代码" } catch (InterruptedException e) { e.printStackTrace(); } } } -
线程类
public class ThreadA extends Thread { private Service service; public ThreadA(Service service) { super(); this.service = service; } @Override public void run() { service.testMethod(); } } -
测试类
public class Demo { public static void main(String[] args) { Service service = new Service(); //启动5个线程 for (int i = 1; i <= 5; i++) { ThreadA a = new ThreadA(service); a.setName("线程 " + i); a.start();//5个线程会同时执行Service的testMethod方法,而某个时间段只能有1个线程执行 } } } -
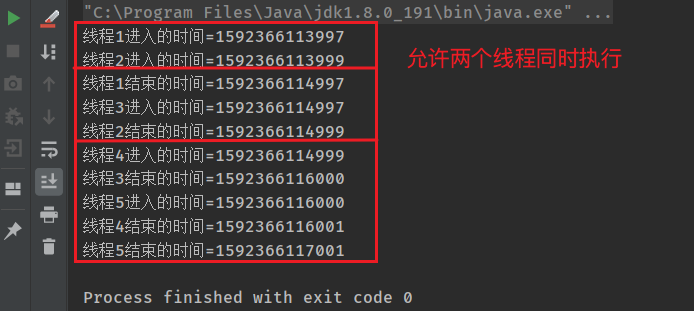
结果
示例二:同时允许2个线程同时执行
-
修改Service类,将new Semaphore(1)改为2即可
public class Service { private Semaphore semaphore = new Semaphore(2);//2表示许可的意思,表示最多允许2个线程执行acquire()和release()之间的内容 public void testMethod() { try { semaphore.acquire(); System.out.println(Thread.currentThread().getName() + " 进入 时间=" + System.currentTimeMillis()); Thread.sleep(5000); System.out.println(Thread.currentThread().getName() + " 结束 时间=" + System.currentTimeMillis()); semaphore.release(); //acquire()和release()方法之间的代码为"同步代码" } catch (InterruptedException e) { e.printStackTrace(); } } } -
结果
5.Exchanger
概述
Exchanger(交换者)是一个用于线程间协作的工具类。Exchanger用于进行线程间的数据交换。
这两个线程通过exchange方法交换数据,如果第一个线程先执行exchange()方法,它会一直等待第二个线程也执行exchange方法,当两个线程都到达同步点时,这两个线程就可以交换数据,将本线程生产出来的数据传递给对方。
Exchanger构造方法:
public Exchanger()Exchanger重要方法:
public V exchange(V x)示例
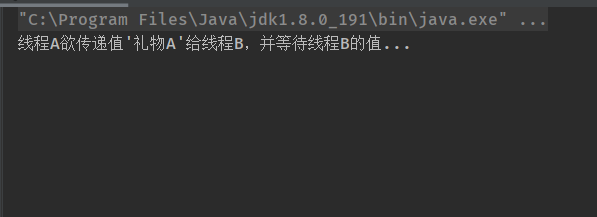
示例一:exchange方法的阻塞特性
-
线程A,并能够接收一个Exchanger对象
public class ThreadA extends Thread { private Exchangerexchanger; public ThreadA(Exchanger exchanger) { super(); this.exchanger = exchanger; } @Override public void run() { try { System.out.println("线程A欲传递值'礼物A'给线程B,并等待线程B的值..."); System.out.println("在线程A中得到线程B的值=" + exchanger.exchange("礼物A")); } catch (InterruptedException e) { e.printStackTrace(); } } } -
测试类
public class Demo { public static void main(String[] args) { Exchangerexchanger = new Exchanger (); ThreadA a = new ThreadA(exchanger); a.start(); } } -
结果
示例二:exchange方法执行交换
-
线程A
public class ThreadA extends Thread { private Exchangerexchanger; public ThreadA(Exchanger exchanger) { super(); this.exchanger = exchanger; } @Override public void run() { try { System.out.println("线程A欲传递值'礼物A'给线程B,并等待线程B的值..."); System.out.println("在线程A中得到线程B的值=" + exchanger.exchange("礼物A")); } catch (InterruptedException e) { e.printStackTrace(); } } } -
线程B
public class ThreadB extends Thread { private Exchangerexchanger; public ThreadB(Exchanger exchanger) { super(); this.exchanger = exchanger; } @Override public void run() { try { System.out.println("线程B欲传递值'礼物B'给线程A,并等待线程A的值..."); System.out.println("在线程B中得到线程A的值=" + exchanger.exchange("礼物B")); } catch (InterruptedException e) { e.printStackTrace(); } } } -
测试类
public class Demo { public static void main(String[] args) throws InterruptedException { Exchangerexchanger = new Exchanger (); ThreadA a = new ThreadA(exchanger); ThreadB b = new ThreadB(exchanger); a.start(); b.start(); } } -
结果

示例三:exchange方法的超时
-
线程A
public class ThreadA extends Thread { private Exchangerexchanger; public ThreadA(Exchanger exchanger) { super(); this.exchanger = exchanger; } @Override public void run() { try { System.out.println("线程A欲传递值'礼物A'给线程B,并等待线程B的值,只等5秒..."); System.out.println("在线程A中得到线程B的值 =" + exchanger.exchange("礼物A",5, TimeUnit.SECONDS)); System.out.println("线程A结束!"); } catch (InterruptedException e) { e.printStackTrace(); } catch (TimeoutException e) { System.out.println("5秒钟没等到线程B的值,线程A结束!"); } } } -
测试类
public class Run { public static void main(String[] args) { Exchangerexchanger = new Exchanger (); ThreadA a = new ThreadA(exchanger); a.start(); } } -
结果
-

使用场景
使用场景:可以做数据校对工作
需求:比如我们需要将纸制银行流水通过人工的方式录入成电子银行流水。为了避免错误,采用AB岗两人进行录入,录入到两个文件中,系统需要加载这两个文件,
并对两个文件数据进行校对,看看是否录入一致,